解决方法来源自VS2017无法进入安装界面问题的解决方法这篇文章下面的评论
TypeScript异步实例化
1 | class BaseClass { |
npm安装puppeteer失败
今天试着使用 apify 这个库,玩玩爬虫,在使用npm install apify --save安装依赖的时候,发现一直卡着不动,然后发现apify这个库依赖于puppeteer,而安装puppeteer的时候会需要下载一个一百多M的包,而包的服务器在国外,基本下不动,没办法去查看源码,在puppeteer的项目根目录下有个install.js文件,可以看到这一句1
2
3const downloadHost = process.env.PUPPETEER_DOWNLOAD_HOST ||
process.env.npm_config_puppeteer_download_host ||
process.env.npm_package_config_puppeteer_download_host;
看到这一句,我们可以使用环境变量修改下载的host,那么改为国内镜像服务器,就可以加速下载了,
国内镜像https://npm.taobao.org/mirrors/chromium-browser-snapshots/
修改一下安装的代码,代码如下1
$ npx cross-env PUPPETEER_DOWNLOAD_HOST=https://npm.taobao.org/mirrors/ npm install apify --save
或者只需要安装puppeteer1
$ npx cross-env PUPPETEER_DOWNLOAD_HOST=https://npm.taobao.org/mirrors/ npm install puppeteer --save
typescript将字符串数组转换为类型
1 | function asLiterals<T extends string>(arr: T[]): T[] { return arr; } |
typescript获取数组的类型
在typescript中,获取数组中的子项类型
有以下代码:
1 | const array = ['a', 'b', 'c']; |
第一次看到(typeof array)[number]的时候,没法理解其中的[number]是什么意思,仔细思考下来,可以理解为(typeof array)[0],这是取数组中的第一个元素的类型,那么引申开来,0可以用number表示,那么(typeof array)[number]去的就是array的所有项目的类型,对于上面这个例子,不管是用(typeof array)[number]还是(typeof array)[0]的结果都是一样的,但是下面这个例子,就不一样了
1 | const array = ['a', '1', true]; |
[翻译]使用React+Typescript2.8的终极开发方式
最近在使用React+Typescript开发项目,刚好找到这篇好文章,翻译到自己博客记录一下,方便以后查找。
原文章:https://levelup.gitconnected.com/ultimate-react-component-patterns-with-typescript-2-8-82990c516935
这篇博文的灵感来自React Component Patterns的帖子
如果你认识我,你肯定知道我不喜欢写无类型的JavaScript,所以从0.9版本之后,我选择了Typescript。除了Typescript,我还喜欢React,当我同时使用React+Typescript的时候,这种感觉非常的棒。
那么这篇文章到底讲了些什么?在网上有许多的文章讲关于React组件的模式,但是没有一篇描述如何将这些模式应用于Typescript。此外,即将推出的TS 2.8的版本更新中,带来了许多令人心奋的功能,如有条件类型,预定义的有条件类型,改进对映射类型修饰符的控制….,这能够让我们更容易在Typescript使用各种React组件模式。
所有代码和示例都基于typescript 2.8的严格模式
开始
首先,我们需要安装typescript和tslib模块,帮助我们生成更精简的代码1
2
3yarn add -D typescript@next
tslib仅作用于编译后的代码,本身不导出任何功能
yarn add tslib
接下来可以初始化我们的typescript配置:1
2 这将在我们的项目目录中创建一个tsconfig.json配置文件
yarn tsc --init
现在让我们安装react,react-dom及其类型定义。1
2yarn add react react-dom
yarn add -D @types/react @types/react-dom
好了,现在让我们开始学习如何在Typescript中使用组件模式。
无状态组件(Stateless Component)
无状态组件是什么?它大多数的时候,只是一个纯函数。现在让我们用typescript来创建一个无状态的Button组件
就像使用JS一样,首先我们需要导入react,它让我们可以使用JSX
1 | import React from 'react' |
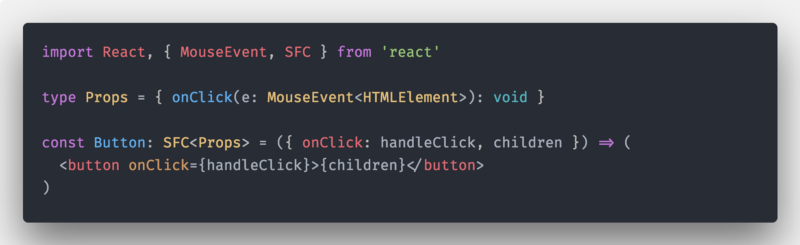
然而tsc编译器将会报错!我们需要明确的告诉component/function我们的props的类型是什么。让我们来定义props:
1 | import React, { MouseEvent, ReactNode } from 'react' |
现在错误解决了,但是我们可以做的更好!
在@types/react中有一个预定义的类型type SFC<P>,它是interface StatelessComponent<P>的一个别名,它有预定义children和一些其他属性(defaultProps,displayName …),使用它我们不必每次都自己写这些属性!
最终我们的无状态组件看起来像这样:
有状态组件(Stateful Component)
让我们创建有状态的计数器组件,它将使用我们的的Button组件
首先,我们需要定义initialState
1 | const initialState = { clicksCount: 0 } |
现在我们将使用Typescript从我们的实现中推断出State类型。
通过这样,我们不必单独维护类型和实现
1 | type State = Readonly<typeof initialState> |
另外需要注意,虽然显式定义了类型为只读的。但是在我们在使用的时候,还是需要显示定义state为只读的。
1 | readonly state: State = initialState |
为什么要这么做,有什么用?
我们知道我们无法在React中直接更新state,如下所示:
1 | this.state.clicksCount = 2 |
这将会在运行的时候抛出错误,但不会再编译期间跑出。通过显式的定义我们的
type State为Readonly,然后在组件中再设置state为readonly,这样TS将知道state是只读的,当出现上面的情况的时候,TS将会抛出错误。
Example
整个有状态组件的实现:
我们的组件没有使用Props API,所以我们需要设置Component的第一个泛型参数为object(因为props在React中被定义为{} ),然后将State作为第二个泛型参数。
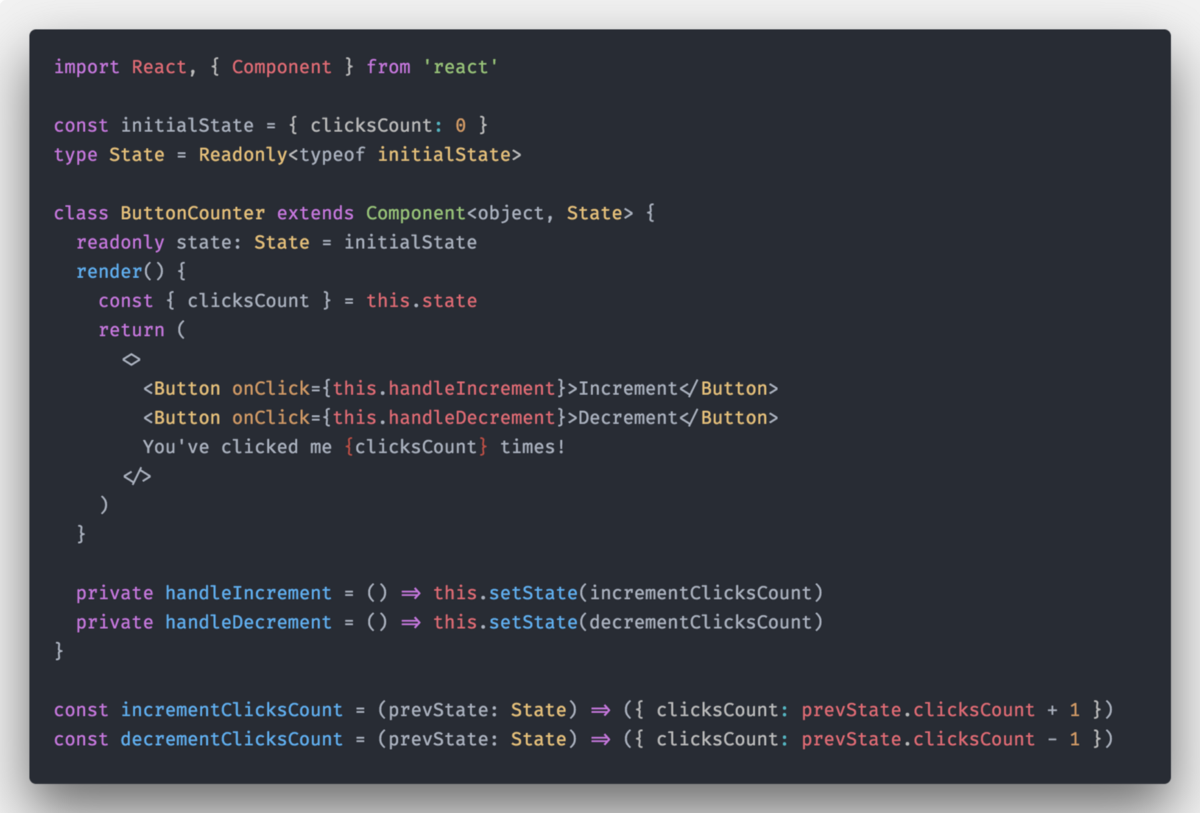
你可能已经注意到我将状态更新函数提取到类外的纯函数。这是一种常见的模式,因为我们可以容易的对这些函数进行测试。另外因为我们正在使用typescript并且我们将State显式设置为只读,它将阻止我们在这些函数中做任何修改
1 | const decrementClicksCount = (prevState: State) |
默认Props(Default Props)
让我们给Button组件做一个扩展,添加一个类型为string的color属性
1 | type Props = { |
如果我们需要定义defaultProps,那么我们可以通过Button.defaultProps = {...}来添加。
然后我们需要修改我们的Props的定义,将有默认值的属性标记为可选的
如下(注意?操作符)
1 | type Props = { |
我们的Component看起来像这样:
1 | const Button: SFC<Props> = ({ onClick: handleClick, color, children }) => ( |
虽然这个方法适用于这个简单的例子,但存在一个问题。因为我们处于严格模式下,所以可选属性color的类型实际为undefined | string的联合类型
假设我们想对那个特殊的属性color做一些操作,TS将会抛出一个错误,因为它不确定color的类型。
为了符合TS编译器,我们有3种方法:
- 使用 非空断言操作符 虽然它是可选的,但可以明确告诉编译器在我们的渲染中这个值不会是
undefined,如下所示:<button onClick={handleClick!}>{children}</button> - 使用 条件语句/三元运算符 使编译器可以推断出prop不是未定义的:
<button onClick={handleClick ? handleClick: undefined}>{children}</button> - 创建可重用的
withDefaultProps高阶函数,使用它更新我们的props类型定义,并设置默认值。我认为这是最干净的解决方案
我们可以非常轻松地实现高阶函数:
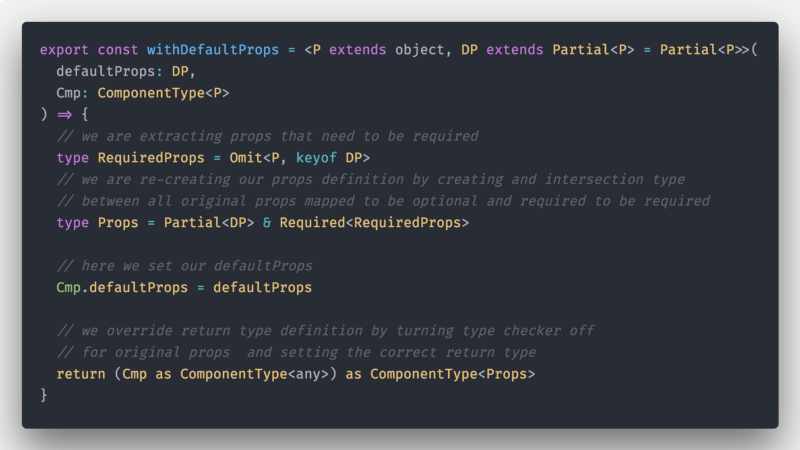
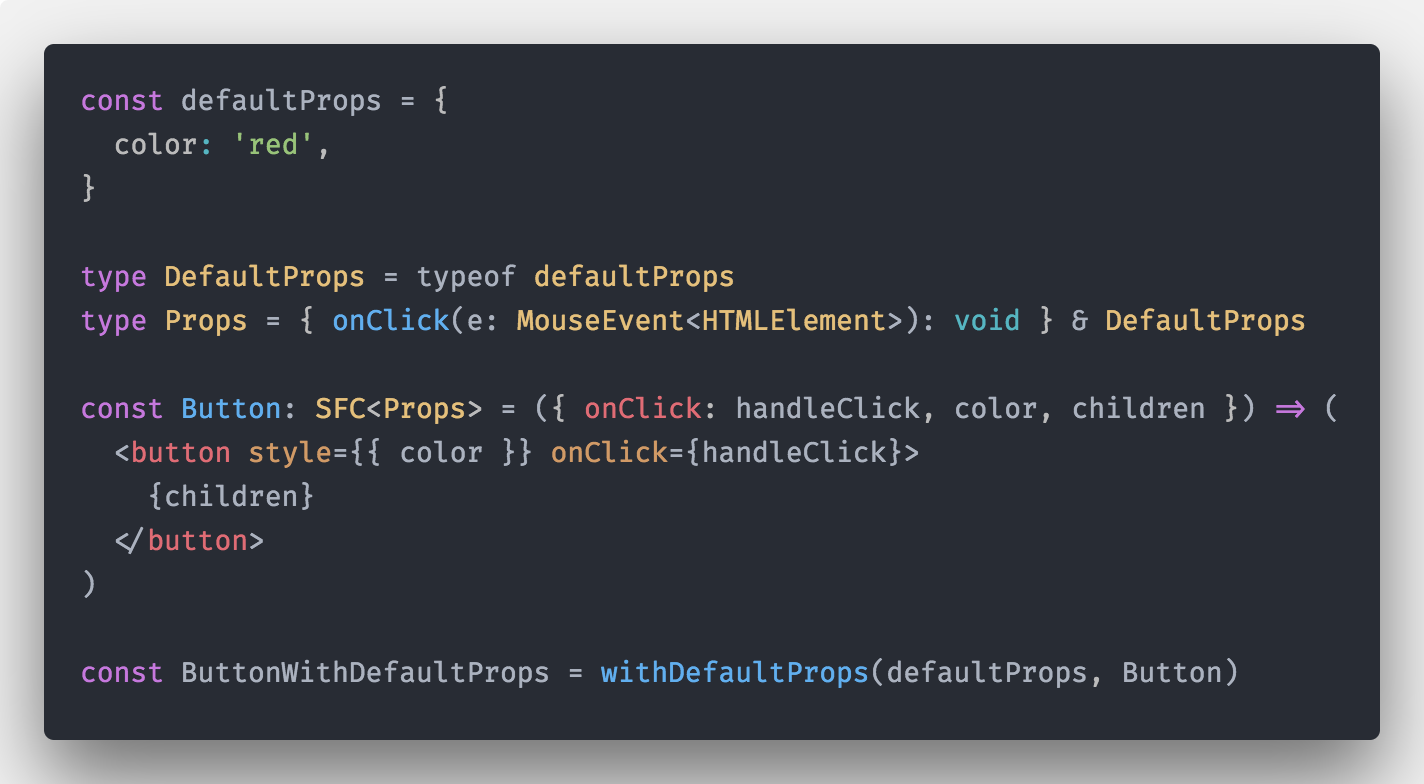
现在我们可以使用我们的withDefaultProps高阶函数来定义我们的默认props,这也将解决我们之前的问题:
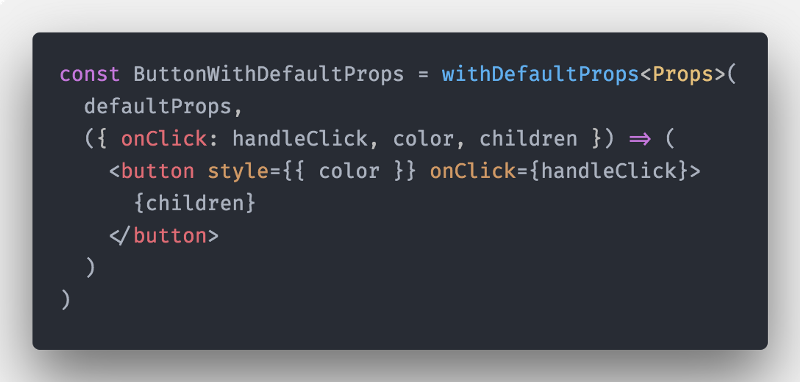
或者直接内联(注意,我们需要显式提供Button Props的类型,因为TS无法从函数中推断出参数类型):
现在Button的Props被正确定义了,但是对于默认的props,在定义的时候,仍然需要设置为可选的。
1 | { |

用法保持不变:
1 | render(){ |
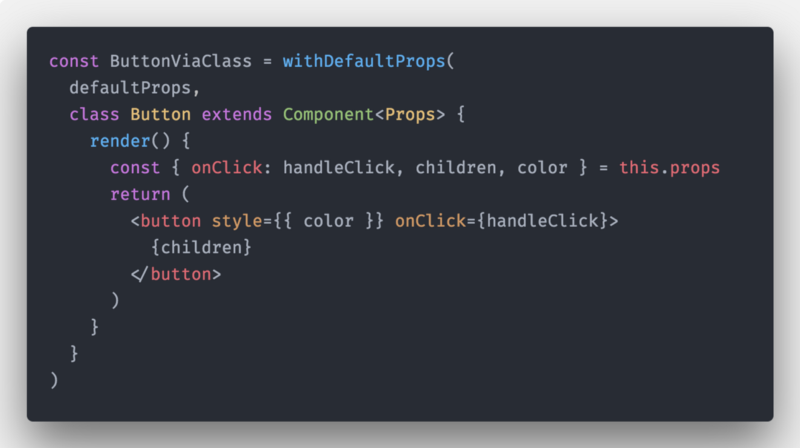
并且,也能通过withDefaultProps定义class组件
它看起来像这样:
用法依然保持不变:
1 | render(){ |
假如你需要构建一个可扩展的菜单组件,当用户点击它时,会显示一些字内容。接下来我们通过使用React的组件模式来实现。
渲染回调/渲染Props模式(Render Callbacks/Render Props pattern)
让组件逻辑可重用的最佳方法是将组件的子组件转换为函数或利用render prop API。
让我们来实现一个含有render props的Toggleable的组件:
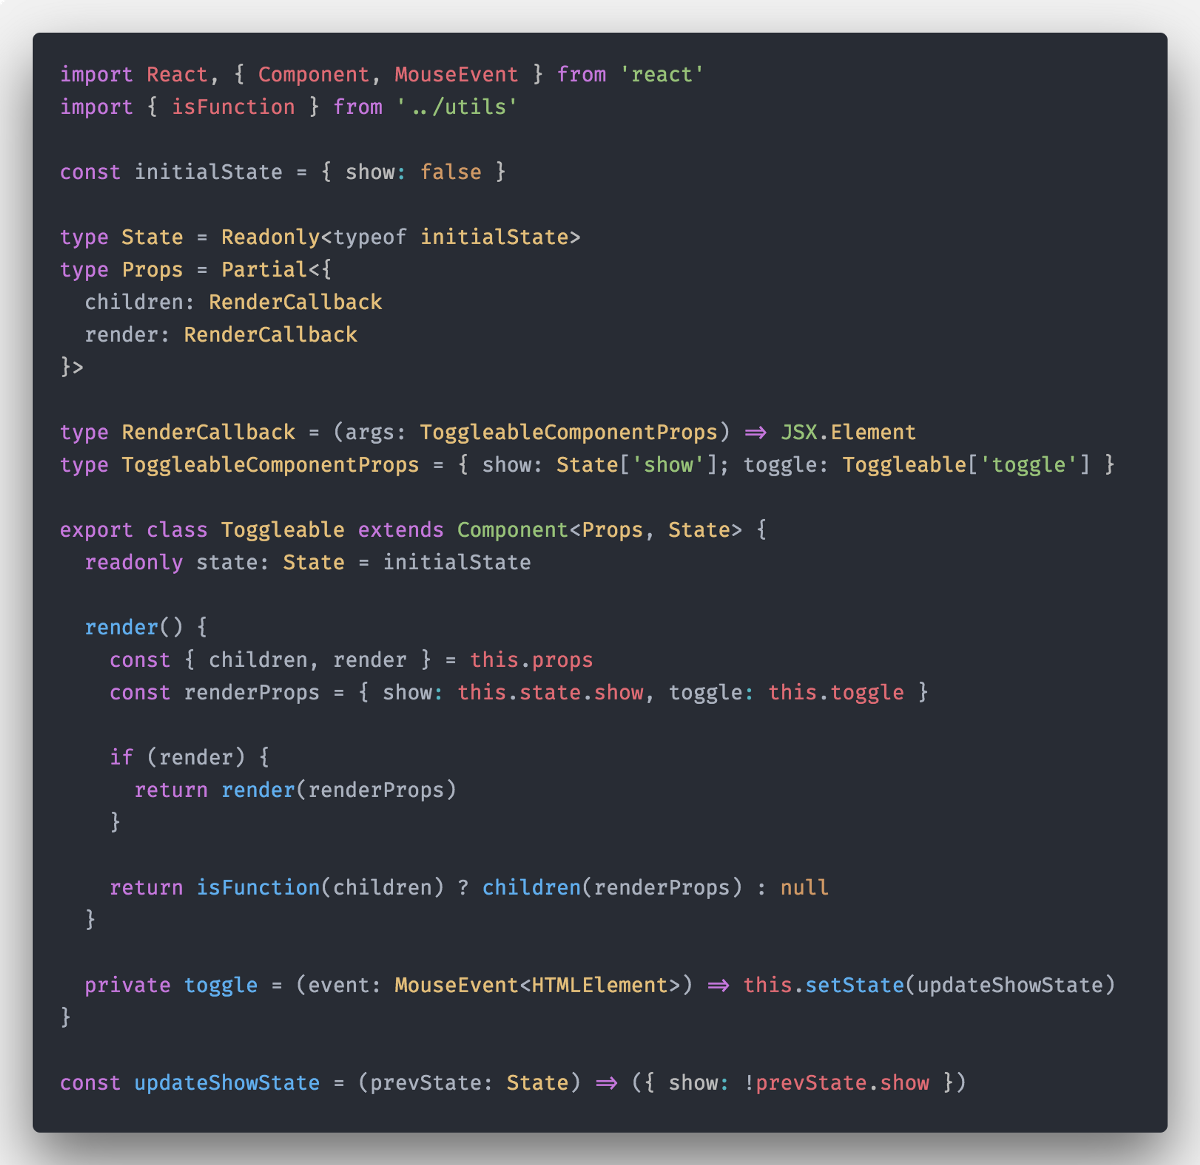
让我们仔细看看我们实现的每个功能:
1 | const initialState = { show: false } |
在这里,我们像前面的例子一样定义我们的状态,没有什么新的东西
现在我们需要定义我们组件的props(注意我们使用的是Partial映射类型,因为我们知道所有props都是可选的,而不是给每个属性手动添加?操作符):
1 | type Props = Partial<{ |
因为我们想要支持两个渲染函数属性,所以这两个属性应该都是可选的。为了DRY,我们可以定义一个RenderCallback渲染函数类型:
1 | type RenderCallback = (args: ToggleableComponentProps) => JSX.Element |
对我们来说最后一个别名可能看起来很奇怪,
type ToggleableComponentProps!
1 | type ToggleableComponentProps = { |
我们再次使用typescript强大的类型查找功能,因此在定义类型时我们不必重复定义:
show: State['show']我们通过show来查找State的类型toggle: Toggleable['toggle']我们通过从类中获取toggle的类型,然后利用TS中的类型推断功能,定义类型
其余的实现都很简单,标准render props/children作为函数模式:
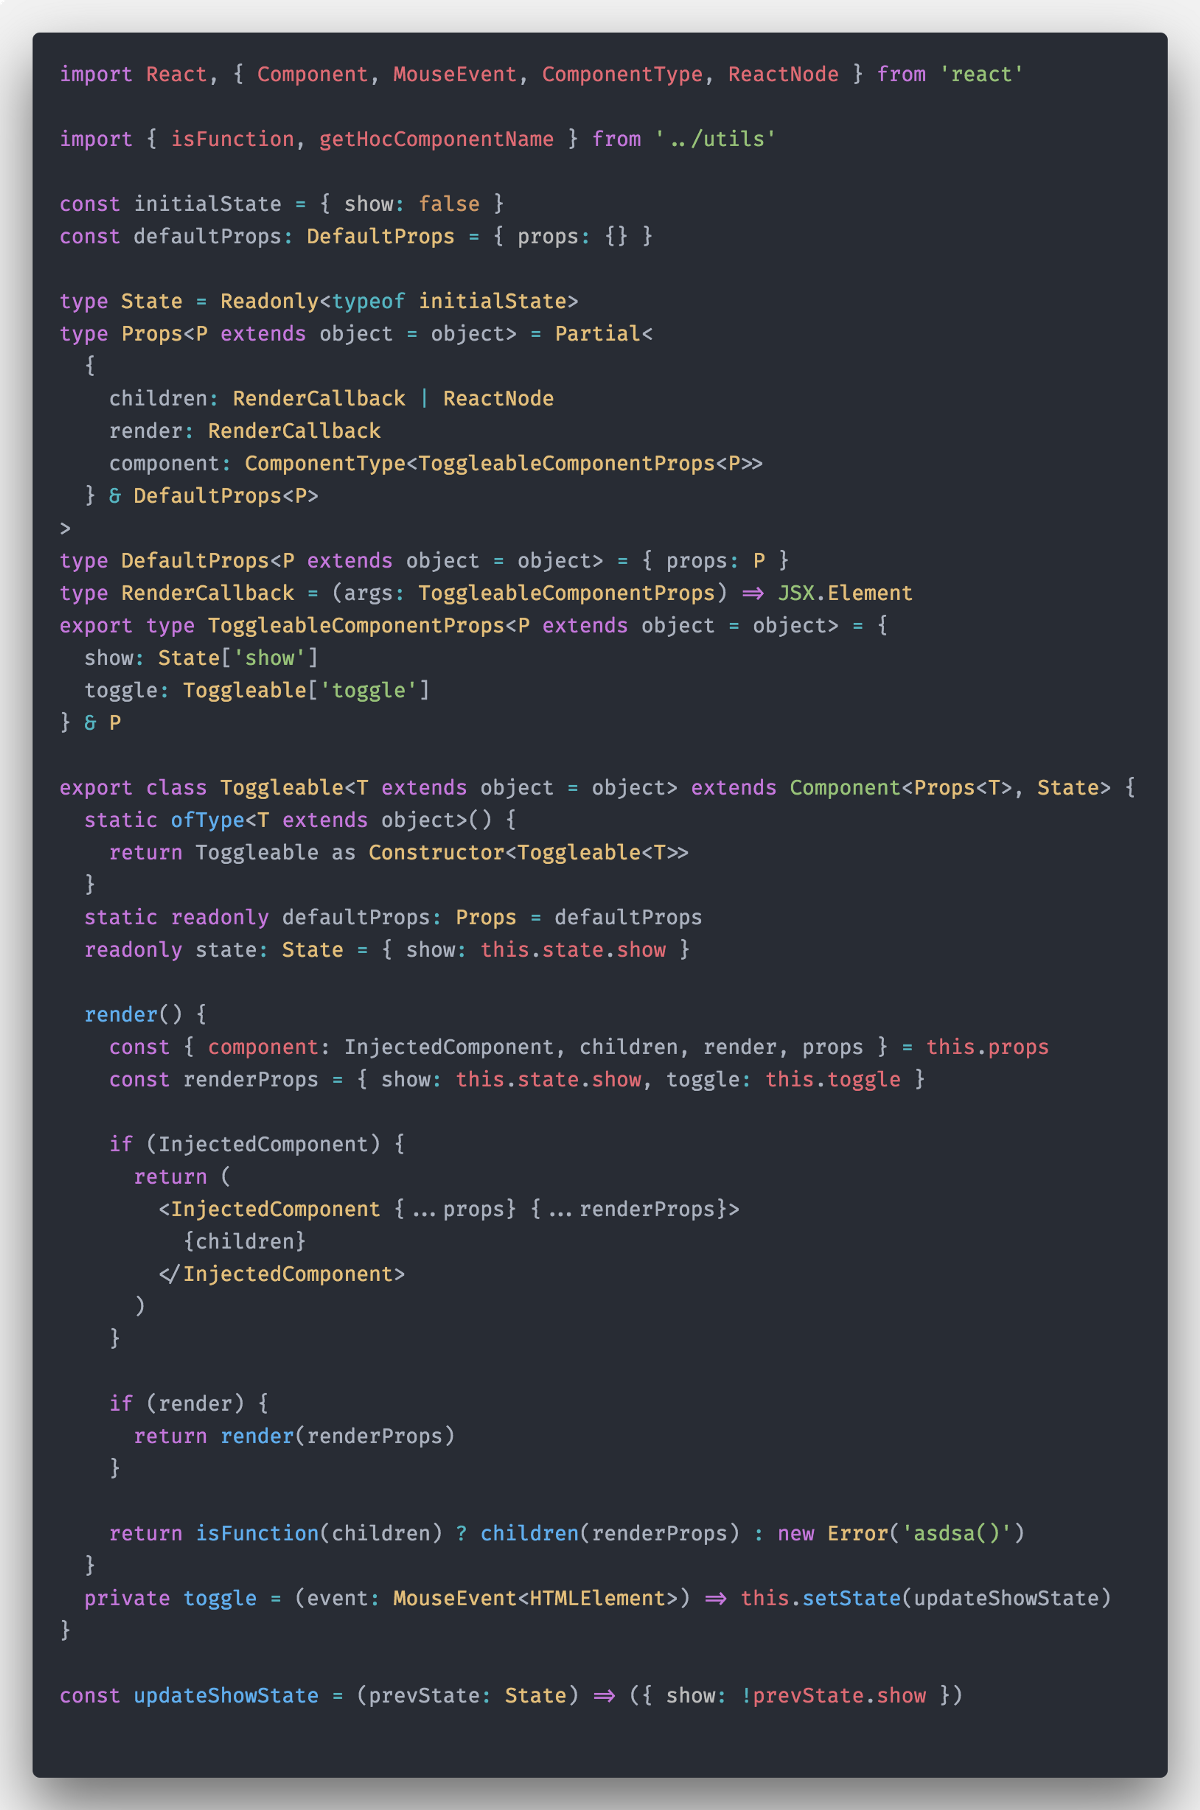
1 | export class Toggleable extends Component<Props, State> { |
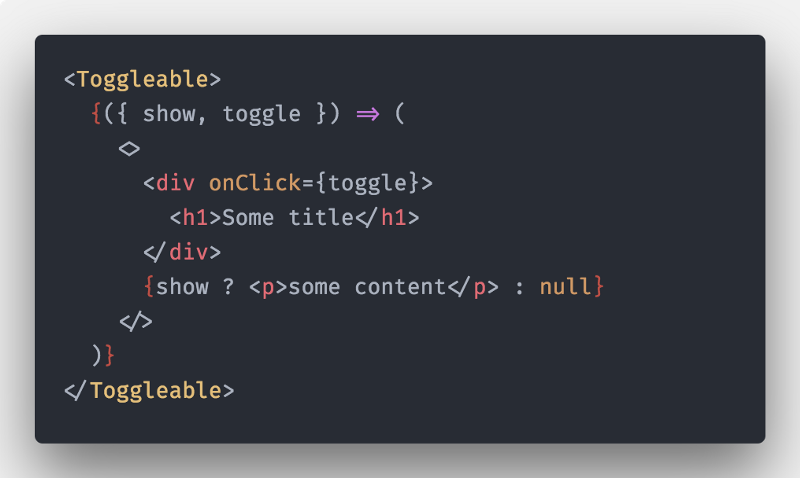
现在我们可以将一个函数作为子组件传递给Toggleable组件:
或者我们可以传递一个函数给render prop:
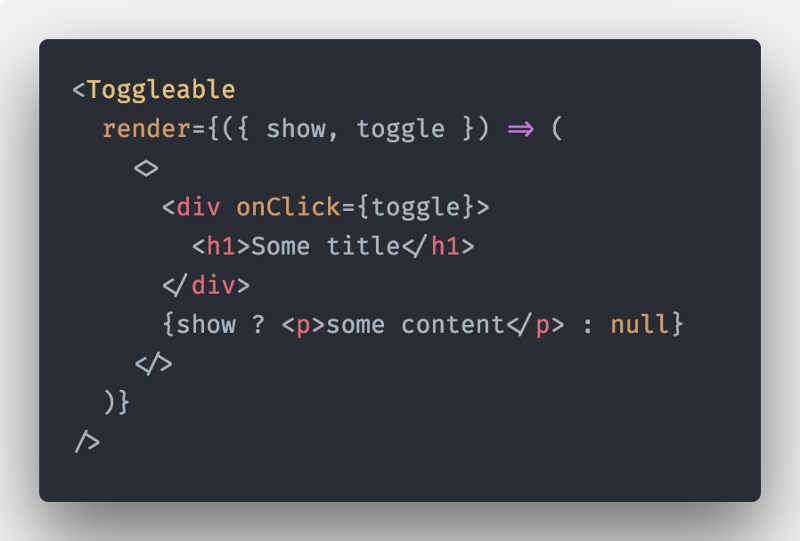
感谢Typescript,我们还可以使用intellisense来对render prop的参数进行正确的类型检查:

如果我们想重用它(对于菜单之类的组件),我们可以快速的创建一个使用Toggleable逻辑的新组件:

我们全新的ToggleableMenu组件可以直接放入Menu中使用:
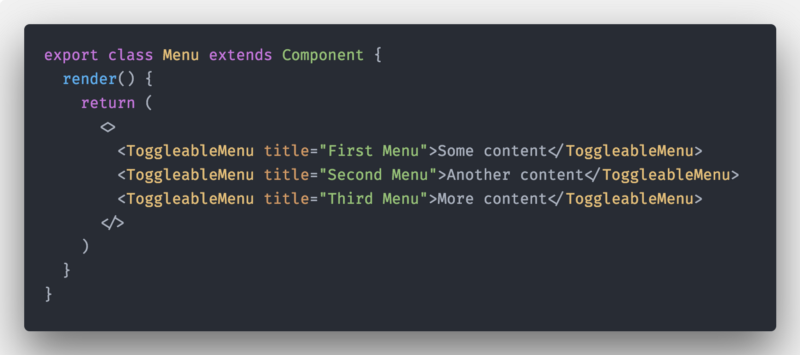
它将按预期工作:
当我们只想改变渲染内容而不管状态时,这种方法非常有用:正如你所看到的,我们已经将渲染逻辑放到我们的ToggleableMenu子函数中,将状态逻辑放到我们的Toggleable组件中!
组件注入(Component Injection)
为了使我们的组件更加灵活,我们可以使用组件注入模式。
什么是组件注入模式?如果你熟悉React-Router,则可以使用以下方式定义路由:
1 | <Route path="/foo" component={MyView} /> |
所以我们可以通过往组件中“注入”component属性来代替,render props/children作为函数模式,因此,可以将内联的渲染函数,重构为一个可重用的无状态组件:
1 | import { ToggleableComponentProps } from './toggleable' |
有了它,我们可以在ToggleableMenu中使用,render props重构:
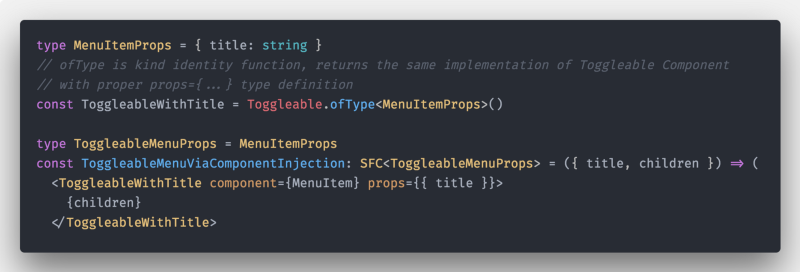
1 | type Props = { title: string } |
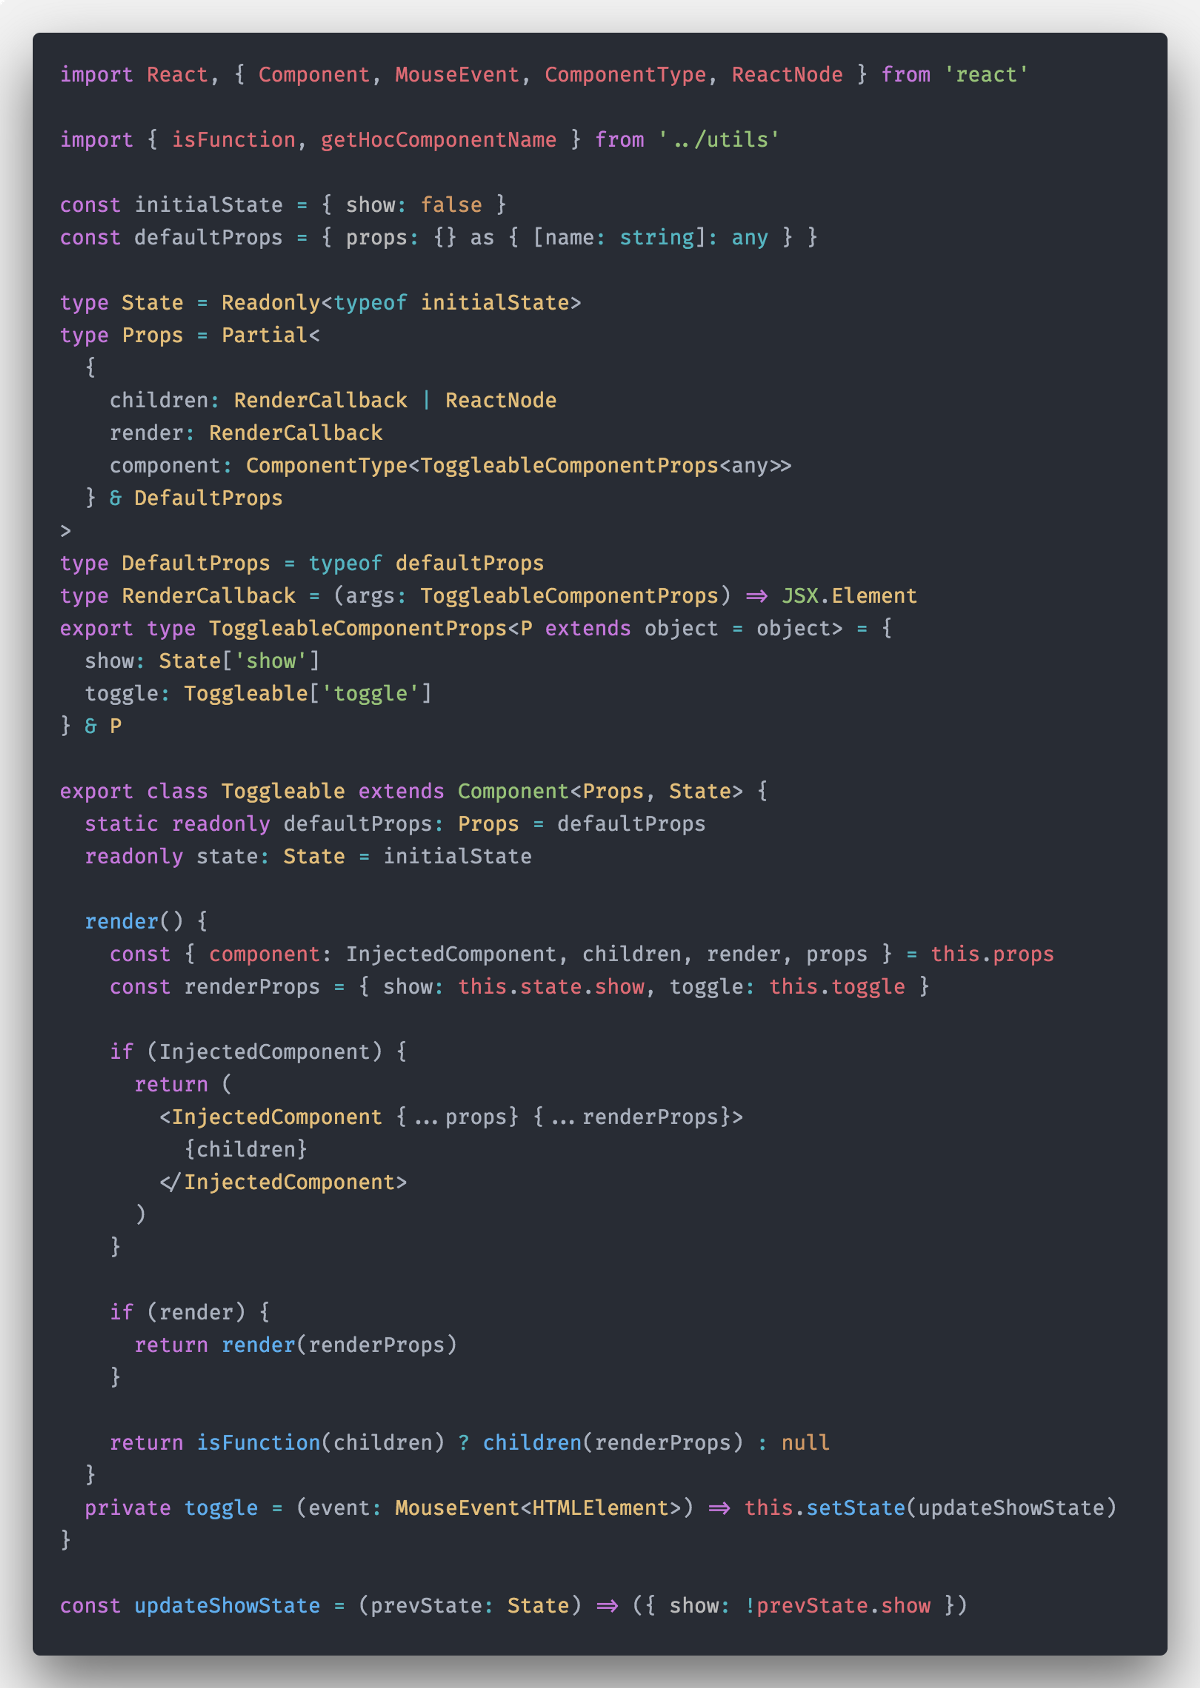
现在完成了,让我们定义我们新的API - component属性。
我们需要更新我们的props API。
children可以是函数或者是ReactNodecomponent是我们新的API,它接受一个实现了ToggleableComponentProps并将泛型设置为any的组件,因此,只要实现了ToggleableComponentProps的组件都可以通过TS校验器props因为需要使用它来传递任意的属性,因此我们需要放弃严格的类型安全,将它定义为any类型的可索引类型,这是一种很常见的模式
1 | const defaultProps = { props: {} as { [name: string]: any } } |
接下来,我们需要给我们的ToggleableComponentProps组件添加新的API,让组件可以被这样使用<Toggleable props={...}/>:
1 | export type ToggleableComponentProps<P extends object = object> = { |
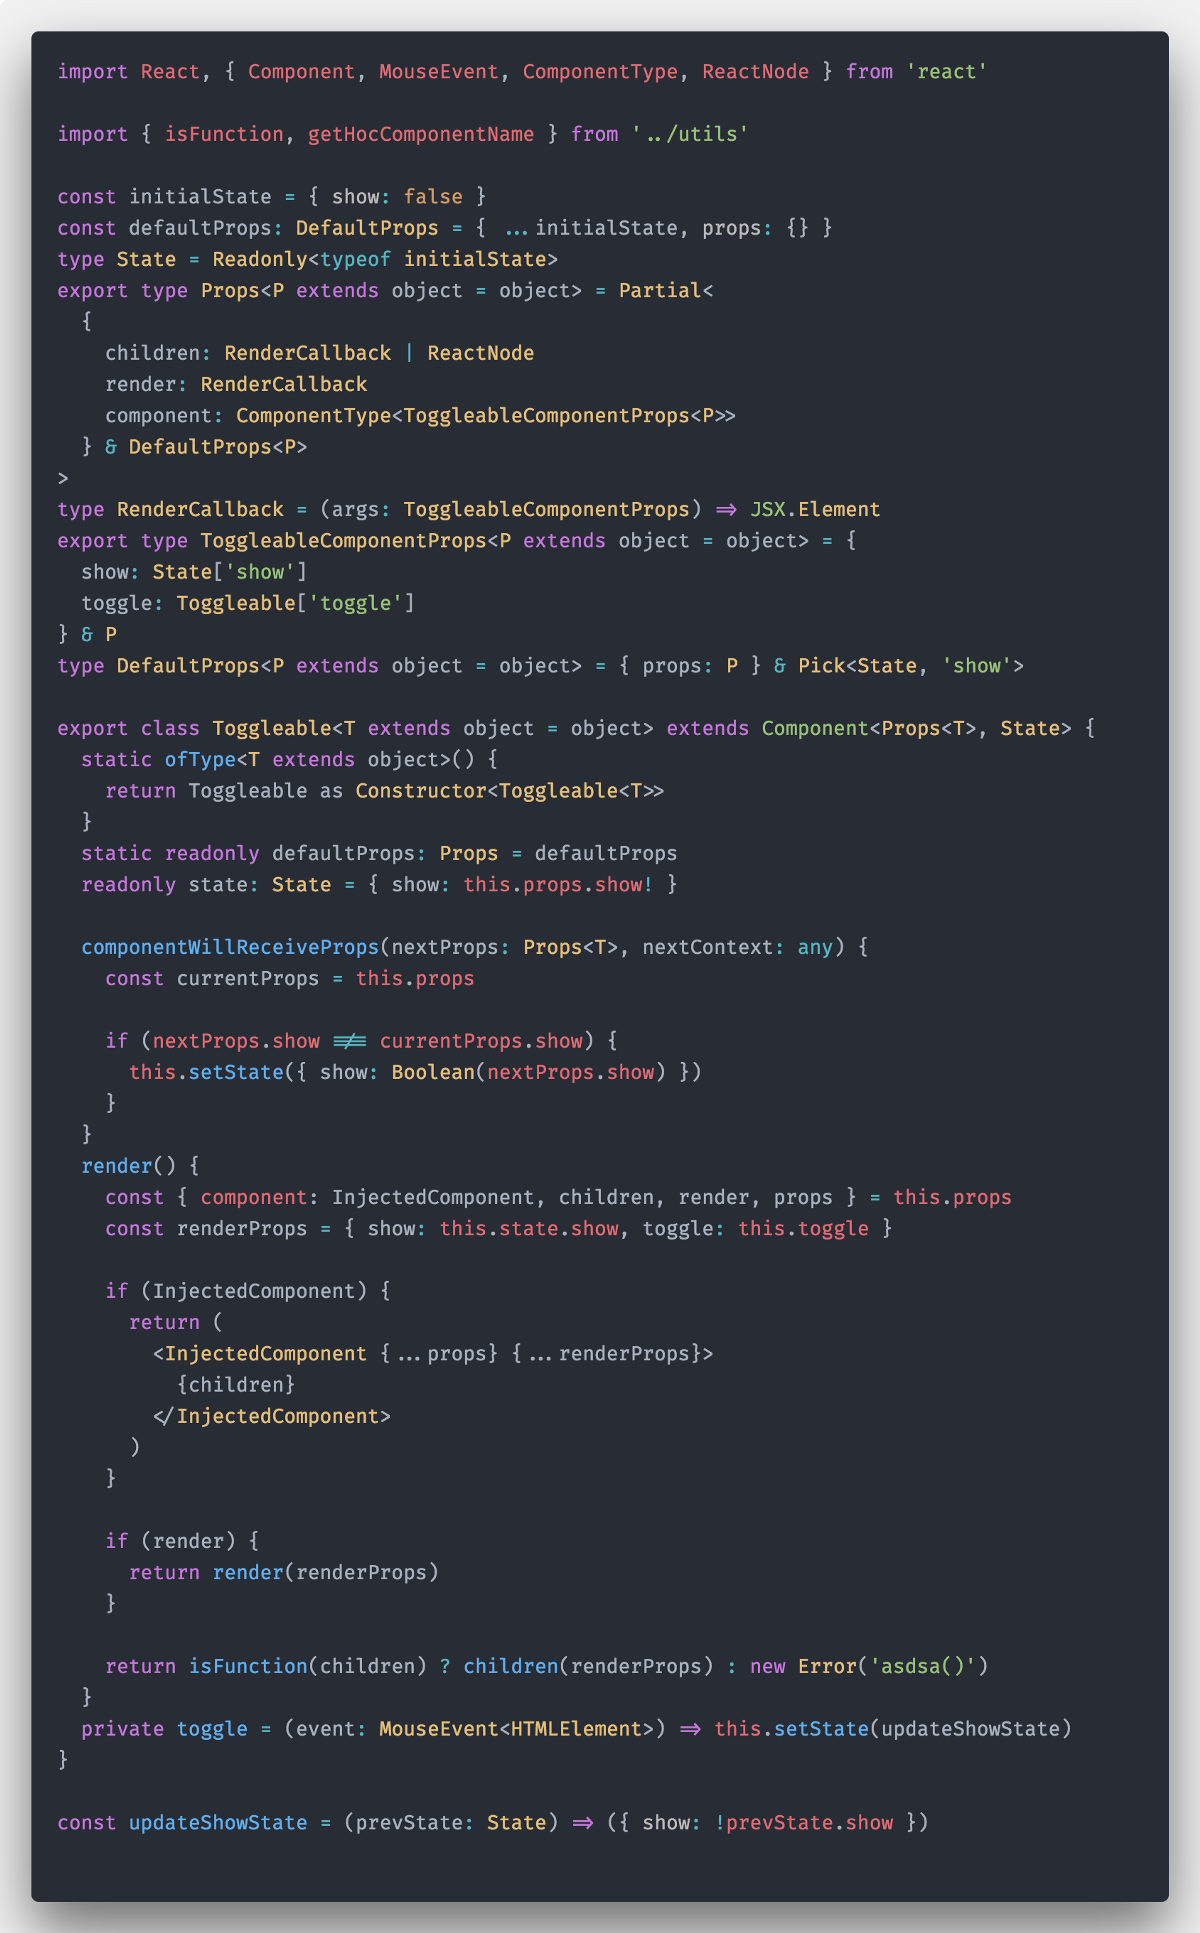
现在我们需要更新我们的render方法
1 | render() { |
接下来我们使用render渲染属性,children作为函数渲染,还有组件注入三种方式实现Toggleable组件:
最后我们看下ToggleableMenuViaComponentInjection怎么使用component的:
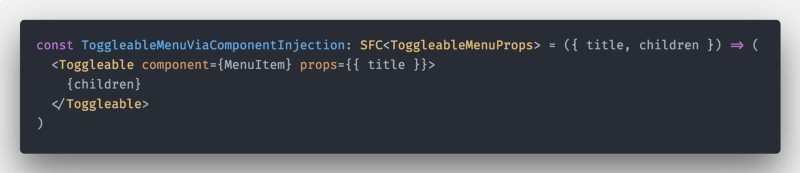
但是要注意,我们对props属性没有做类型检查,因为它被定义为可索引对象{ [name: string]: any }
现在我们可以像ToggleableMenu一样使用ToggleableMenuViaComponentInjection
1 | export class Menu extends Component { |
泛型组件(Generic Components)
当我们在实现“组件注入模式”的时候,我们放弃了对组件的props中的props属性的类型检查。现在也想对它进行类型检查,那么我们可以将Toggleable改写为泛型组件!
首先,我们需要定义我们的props的泛型,并添加默认的泛型参数,这样我们就可以不需要显式的提供泛型参数(用于render props/children作为函数)
1 | type Props<P extends object = object> = Partial< |
我们还需要将ToggleableComponentProps改为泛型的。但是,它好像已经是了,所以不需要做任何修改。
需要改变的定义是type DefaultProps,修改如下:
1 | type DefaultProps<P extends object = object> = { props: P } |
几乎完成了!
现在让我们定义我们的class泛型组件。我们再次使用默认参数,这样我们在使用组件的时候,不必指定泛型参数!
1 | export class Toggleable<T = {}> extends Component<Props<T>, State> {} |
定义好了,那么我们如何在JSX中使用呢?
一个坏消息,我们没法直接使用…
我们需要引入ofType泛型组件工厂模式
1 | export class Toggleable<T extends object = object> extends Component<Props<T>, State> { |
Toggleable组件支持,render函数、children作为函数、组件注入、泛型props的实现如下:
现在使用static ofType工厂方法,我们可以创建类型正确的泛型组件
不需要做任何改变,但是这次我们的props属性就可以正确的做类型检查了。
高阶组件(High Order Components)
因为我们已经使用了render callback模式创建Toggleable组件,所以很容易实现HOC。(这也是render callback模式的一大优势,我们可以利用它来实现HOC)
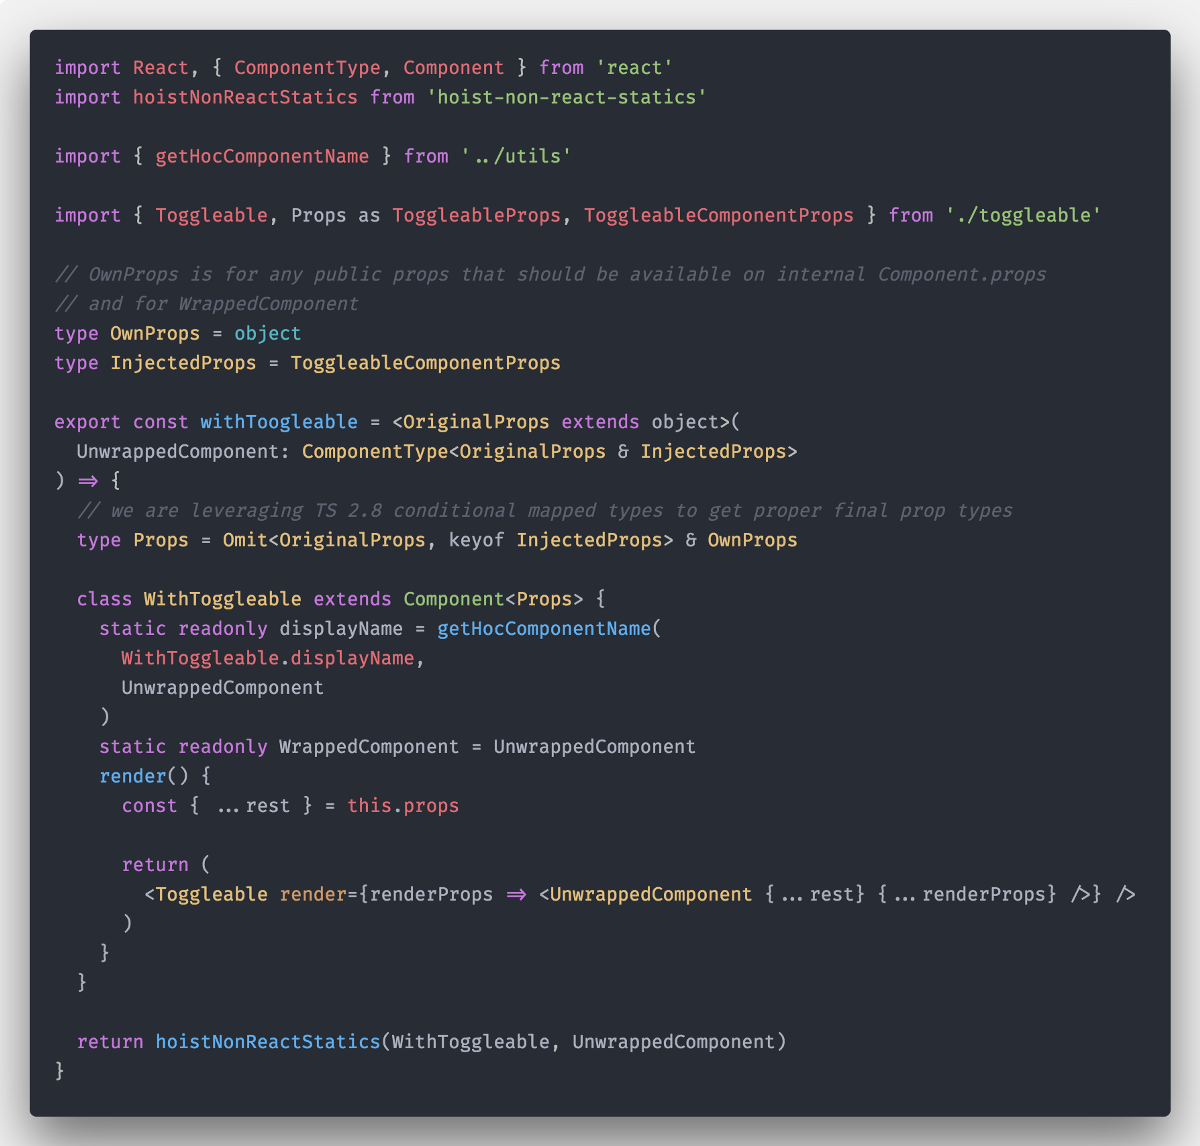
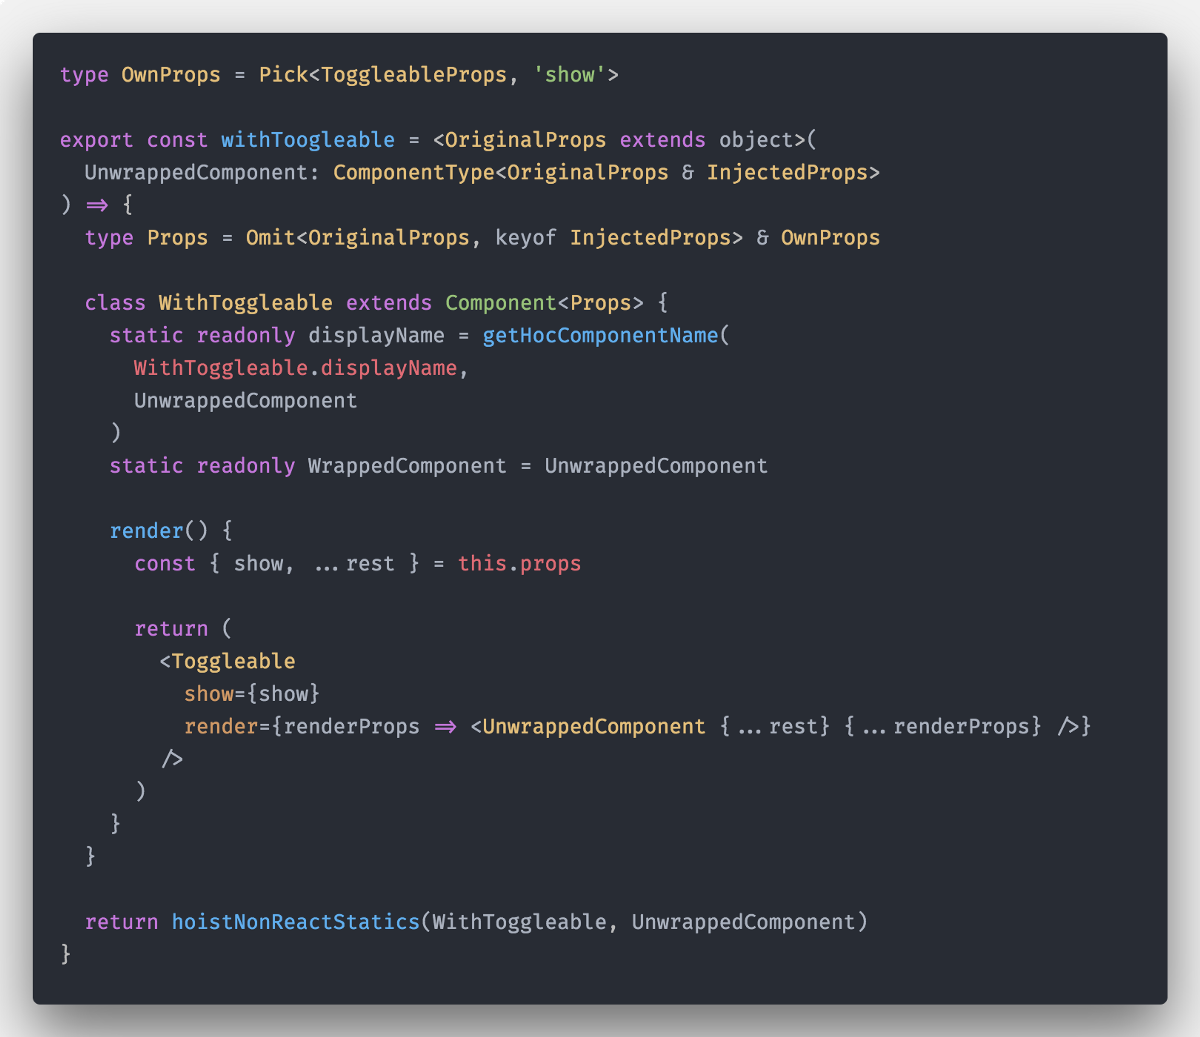
让我们来实现我们的HOC:
我们需要创建:
- displayName(为了方便在devtools中调试)
- WrappedComponent(为了我们能够知道原始组件 - 对测试很有用)
- 从
hoist-non-react-staticsnpm包中,引入hoistNonReactStatics方法
现在我们也可以通过HOC创建Toggleable菜单项,并且props也是类型安全的!

所有代码都正常工作,并且都能够做类型校验!
受控组件(Controlled Components)
在文章的最后!我们希望父组件能够控制Toggleable中的内容显示。这是一种非常强大的模式。
我们需要修改我们的ToggleableMenu组件的实现,如下所示:
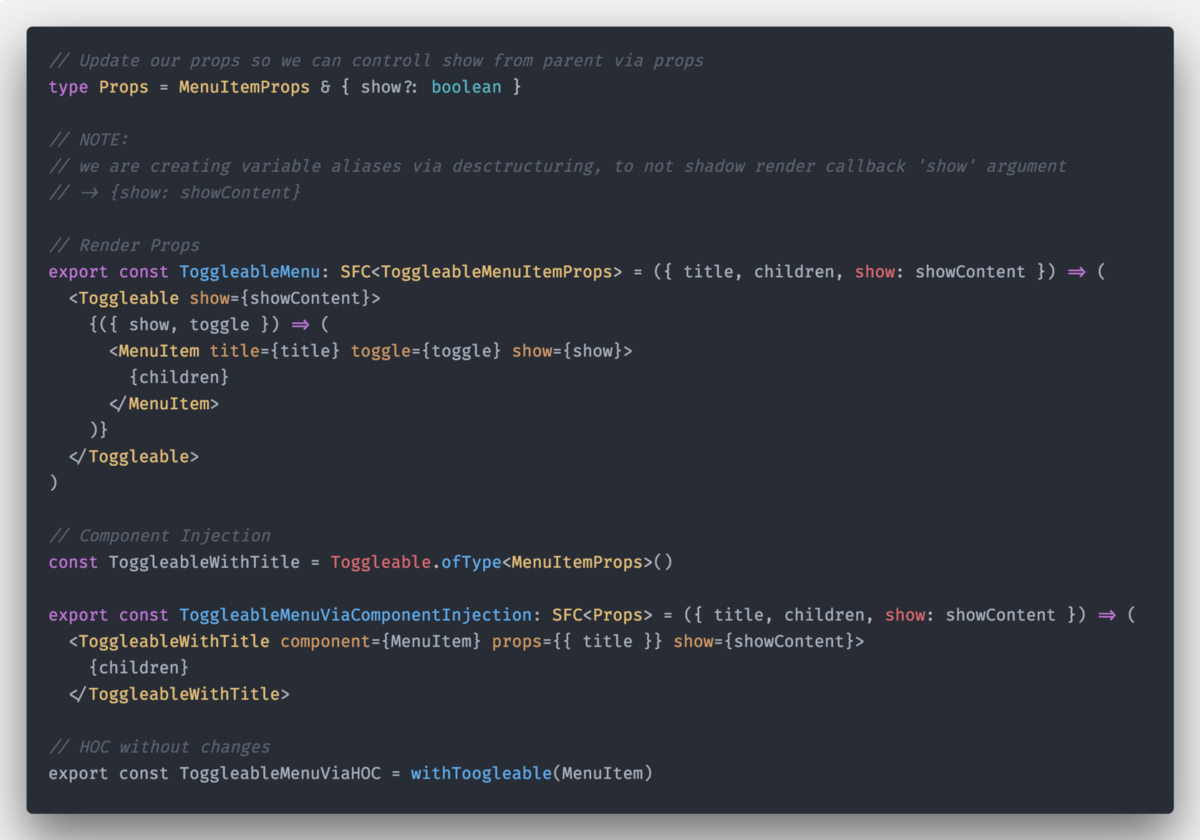
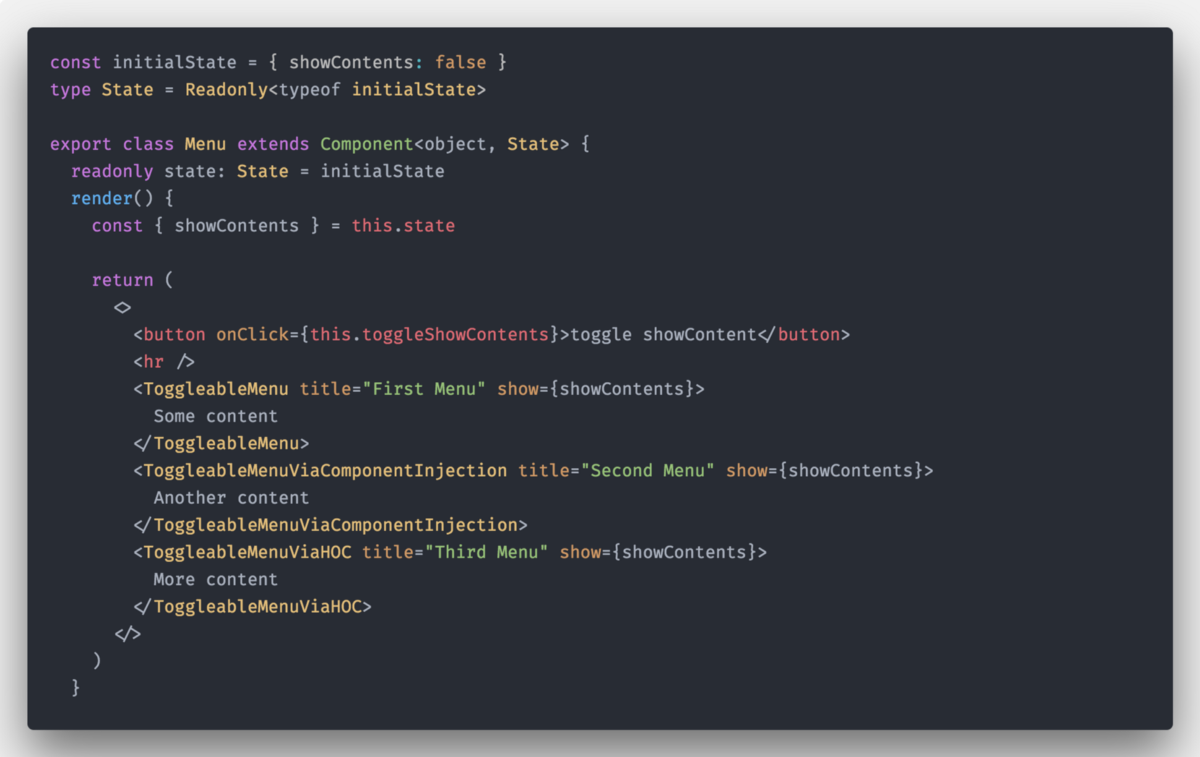
修改完成之后,接下来需要在Menu中添加状态,并将它传递给ToggleableMenu
让我们最后一次更新我们的Toggleable
开发我们的Toggleable受控组件,我们需要执行以下操作:
- 添加
show到我们的PropsAPI - 更新默认props(因为
show是可选参数) - 将初始化的Component.state设置为Props.show的值,因为真实的数据来自于父级组件
- 在componentWillReceiveProps生命周期函数中,从props中正确更新state
1&2:
1 | const initialState = { show: false } |
3&4:
1 | export class Toggleable<T = {}> extends Component<Props<T>, State> { |
最后,我们的Toggleable组件支持所有的模式(render Props/Children作为函数/组件注入/泛型组件/受控组件)
最后的最后,通过withToggleable生成高阶组件Toggleable
只需要简单修改一下,我们只需要将show属性的值传递给我们的高阶组件,并且更新OwnPropsAPI就可以了。
总结
在React中使用Typescript编写类型安全的组件可能很棘手。但是因为Typescript 2.8添加的新功能,我们几乎可以遵循常见的React组件模式来编写类型安全的组件。
在这篇超级长的文章中,我们学习了在Typescript严格模式中,实现了类型安全的具有各种模式的组件。
在所有模式中,最强大的模式确实是Render Props,它允许我们实现其他的常见模式,如组件注入或HOC。
这篇文章中的所有的demos都可以在我的Github中找到
同样重要的是,我们可以意识到,只有使用VDOM/JSX的库中,才能在模板中实现类型安全,如本文所示。
- Angular在模板中提供了类型的检查,但是在诸如ngFor等指令内部的检查却失败了…
- Vue还没有实现和Angular一样的模板类型检查,所以他们的模板和数据绑定只是魔术字符串
如果你有任何问题,可以在这里或者是我的twitter中问我。
javascript计算两条直线的夹角
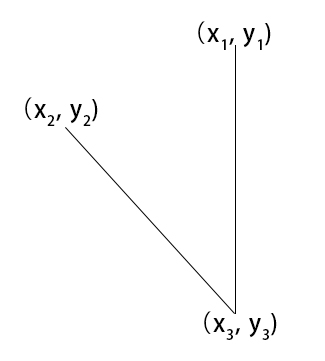
计算上面两直线的夹角,代码如下1
2
3
4
5
6
7
8
9
10
11
12
13
14const getAngle = ({ x: x1, y: y1 }, { x: x2, y: y2 }) => {
const dot = x1 * x2 + y1 * y2
const det = x1 * y2 - y1 * x2
const angle = Math.atan2(det, dot) / Math.PI * 180
return (angle + 360) % 360
}
const angle = getAngle({
x: x1 - x3,
y: y1 - y3,
}, {
x: x2 - x3,
y: y2 - y3,
});
console.log(angle);
typescript在ES3(IE7)环境下使用async、await
因为公司产品需要搞个Web App,但是又需要兼容IE7,这时候整个应用会非常复杂,尤其是在处理异步的时候,在我的选择中有两个方案
- callback方案
- async/await
经过衡量以后,决定使用async/await方案
配置typescript环境
1 | mkdir typescript-async # 新建项目目录 |
webpack.dev.js改为如下1
2
3
4
5
6
7
8
9
10
11
12
13
14
15
16
17
18
19
20
21
22
23
24const path = require('path');
const es3ifyPlugin = require('es3ify-webpack-plugin');
module.exports = {
mode: 'development',
entry: './src/index.ts',
output: {
path: path.resolve(__dirname, 'build'),
filename: '[name].js',
},
module: {
rules: [{
test: /\.ts$/,
use: ['ts-loader'],
}],
},
resolve: {
extensions: ['.ts'],
},
devtool: "source-map",
plugins: [
new es3ifyPlugin(),
],
};
package.json修改为如下1
2
3
4
5
6
7
8{
// ...
"scripts": {
- "test": "echo \"Error: no test specified\" && exit 1",
+ "start": "webpack --config webpack.dev.js"
}
// ...
}
tsconfig.json修改为如下1
2
3
4
5
6
7
8
9
10
11{
"compilerOptions": {
// ...
- "target": "es5",
+ "target": "es3",
// ...
- "strict": true,
+ "strict": false,
// ...
}
}
配置测试
1 | mkdir src |
index.ts改为如下1
2
3
4
5const log = (text: string) => console.log(text);
for (let i = 0; i < 5; i++) {
log(String(i));
}
编译源码1
npm start
只要没有报错,就可以在看到build/main.js文件,这个文件就是编译后的结果,那么typescript的编译环境就搭建好了
支持async、await
1 | npm i es6-promise --save # 安装promise polyfill |
webpack.dev.js改为如下1
2
3
4
5
6
7
8module.exports = {
// ...
resolve: {
- extensions: ['.ts'],
+ extensions: ['.js', '.ts'],
},
// ...
};
tsconfig.json修改为如下1
2
3
4
5
6
7
8
9
10
11{
"compilerOptions": {
// ...
+ "lib": [
+ "dom",
+ "es2015",
+ "scripthost"
+ ],
// ...
}
}
src/index.ts改为如下1
2
3
4
5
6
7
8import "es6-promise/auto"; // 低版本浏览器支持promise
const delay = (time: number) => new Promise(resolve => setTimeout(resolve, time));
(async () => {
await delay(1000);
alert('done.');
})();
编译源码1
npm start
编译成功,async/await在ES3的环境下可以使用了
优化helpers代码
什么是helpers代码?直接看例子,有以下代码
src/index.ts改为如下1
2
3
4
5
6
7
8
9
10
11
12
13
14import "es6-promise/auto";
import delayA from "./a";
import delayB from "./b";
const delay = (time: number) => new Promise(resolve => setTimeout(resolve, time));
(async () => {
await delay(1000);
alert('1');
await delayA(1000);
alert('2');
await delayB(1000);
alert('3');
})();
src/a.ts改为如下1
2
3
4
5
6
7const delay = (time: number) => new Promise(resolve => setTimeout(resolve, time));
async function delayA(time: number) {
await delay(time);
}
export default delayA;
src/b.ts改为如下1
2
3
4
5
6
7const delay = (time: number) => new Promise(resolve => setTimeout(resolve, time));
async function delayB(time: number) {
await delay(time);
}
export default delayB;
编译源码1
npm start
查看生成后的代码build/main.js,会看到有以下部分1
2
3
4
5
6
7
8
9
10
11
12
13
14
15
16
17
18
19
20
21
22
23
24
25
26
27
28
29
30
31
32
33
34
35
36
37
38
39
40
41
42
43
44
45
46
47
48
49
50
51
52
53
54
55
56
57
58
59
60
61
62
63
64
65
66
67
68
69
70
71
72
73
74
75
76
77
78
79
80
81
82
83
84
85
86
87
88
89
90
91
92
93
94
95
96
97
98
99
100
101
102
103
104
105
106
107
108
109
110
111
112
113
114
115
116
117
118
119
120
121
122// 省略以上代码
/************************************************************************/
/******/ ({
/***/ "./src/a.ts":
/*!******************!*\
!*** ./src/a.ts ***!
\******************/
/*! no static exports found */
/***/ (function(module, exports, __webpack_require__) {
;
var __awaiter = (this && this.__awaiter) || function (thisArg, _arguments, P, generator) {
// ...省略
};
var __generator = (this && this.__generator) || function (thisArg, body) {
// ...省略
};
exports.__esModule = true;
var delay = function (time) { return new Promise(function (resolve) { return setTimeout(resolve, time); }); };
function delayA(time) {
return __awaiter(this, void 0, void 0, function () {
return __generator(this, function (_a) {
switch (_a.label) {
case 0: return [4 /*yield*/, delay(time)];
case 1:
_a.sent();
return [2 /*return*/];
}
});
});
}
exports["default"] = delayA;
/***/ }),
/***/ "./src/b.ts":
/*!******************!*\
!*** ./src/b.ts ***!
\******************/
/*! no static exports found */
/***/ (function(module, exports, __webpack_require__) {
;
var __awaiter = (this && this.__awaiter) || function (thisArg, _arguments, P, generator) {
// ...省略
};
var __generator = (this && this.__generator) || function (thisArg, body) {
// ...省略
};
exports.__esModule = true;
var delay = function (time) { return new Promise(function (resolve) { return setTimeout(resolve, time); }); };
function delayB(time) {
return __awaiter(this, void 0, void 0, function () {
return __generator(this, function (_a) {
switch (_a.label) {
case 0: return [4 /*yield*/, delay(time)];
case 1:
_a.sent();
return [2 /*return*/];
}
});
});
}
exports["default"] = delayB;
/***/ }),
/***/ "./src/index.ts":
/*!**********************!*\
!*** ./src/index.ts ***!
\**********************/
/*! no static exports found */
/***/ (function(module, exports, __webpack_require__) {
;
var __awaiter = (this && this.__awaiter) || function (thisArg, _arguments, P, generator) {
// ...省略
};
var __generator = (this && this.__generator) || function (thisArg, body) {
// ...省略
};
var __importDefault = (this && this.__importDefault) || function (mod) {
return (mod && mod.__esModule) ? mod : { "default": mod };
};
var _this = this;
exports.__esModule = true;
__webpack_require__(/*! es6-promise/auto */ "./node_modules/es6-promise/auto.js");
var a_1 = __importDefault(__webpack_require__(/*! ./a */ "./src/a.ts"));
var b_1 = __importDefault(__webpack_require__(/*! ./b */ "./src/b.ts"));
var delay = function (time) { return new Promise(function (resolve) { return setTimeout(resolve, time); }); };
(function () { return __awaiter(_this, void 0, void 0, function () {
return __generator(this, function (_a) {
switch (_a.label) {
case 0: return [4 /*yield*/, delay(1000)];
case 1:
_a.sent();
alert('1');
return [4 /*yield*/, a_1["default"](1000)];
case 2:
_a.sent();
alert('2');
return [4 /*yield*/, b_1["default"](1000)];
case 3:
_a.sent();
alert('3');
return [2 /*return*/];
}
});
}); })();
/***/ })
/******/ });
//# sourceMappingURL=main.js.map
可以看到大量的重复的__awaiter、__generator代码,这个就是helpers代码,我们需要去掉重复的代码,处理的方式有以下两种
方法1:importHelpers开关
1 | npm i tslib --save # 安装tslib |
tsconfig.json修改为如下1
2
3
4
5
6
7{
"compilerOptions": {
// ...
+ "importHelpers": true,
// ...
}
}
注:上面这种方式需要支持Object.defineProperty这个方法,但是ES3环境不支持,所以ES3环境下不能用这个方式
方法2:noEmitHelpers开关
1 | npm i tslib --save # 安装tslib |
tsconfig.json修改为如下1
2
3
4
5
6
7{
"compilerOptions": {
// ...
+ "noEmitHelpers": true,
// ...
}
}
src/index.ts改为如下1
2
3import "es6-promise/auto";
+ import 'tslib/tslib';
// ...
编译源码1
npm start
查看生成后的代码build/main.js,可以看到重复的部分没有了
以上就是整个在ES3环境下使用async/await的方法